Label Remover

Monday, April 28, 2014


I have to talk about this product. UN-DU sticker, tape & label remover. This stuff is awesome! I found this stuff at Walmart in the craft section the other day, but I'm sure it can be ordered online as well. So the group of hobbyists I'm directing this at are home brewers who are still cleaning labels off reused bottles. I'm sure this product works great on all other products attached by adhesive, but I can tell you it works fantastic on beer labels.


 I still soak my bottles in hot water, to clean off any goop still inside the bottle and to soften up the paper labels. The problem with most labels is not the actual label, its the adhesive that keeps the label attached to the glass bottle. That is where this UN-DU comes in. I added a few drops to the adhesive still stuck on the bottle, and it practically whips away. The bottle also has that black scrapper, that does a really good job getting under really tough sections of labels, such as champagne labels. I'm not one to really promote products, but seriously this stuff cut my bottle cleaning in half. Its really does a great job at getting glue and adhesive's off.


I hope this helps some of you out, and feel free to leave any comments if this helps out!

Thanks


Past projects.

Saturday, April 19, 2014

These are a few pallet projects I did awhile back, and thought I would put up some pictures for everyone to see.

This is a dog bed made from one pallet, it was super simple and took about 2 hours to complete.


A dog food station, this one took a few hours over a couple of days to finish. It was a project I had been wanting to do for a long while, and the dogs love it.... spoiled rotten pups.

This project was a Pintrest project, that ended up looking really nice.

Coat hanger tree.


I love using pallets for projects, for one there free most of the time and second, they give a project a rustic look. I know pallet projects are all over Pintrest and DIY sites right now, which makes the ability to find pallets a lot harder. But there still around if you keep your eye out. As always I hope you guys love the pictures.

Thanks.


Palmar Tent Lodge

Thursday, April 17, 2014

I want to give a little shout out to one of my most favorite places I've visited.  My wife and I were backpacking through Costa Rica and Panama a year or so ago and volunteered for awhile at  Palmar Tent Lodge located on Isla Bastimentos in the Bocas del Toro Province of Panama.  Palmar is an amazing place ran by two amazing people, Chris & Kristin. Just a stone's throw from Red Frog beach you'll be laying out and relaxing as soon as you arive. It was rated as on of the top 10 secret beaches by the Travel Channel. Palmar is a great escape from... well Everything!


Palmar is a tent lodge and falls in to the glamping category or glamor camping for those of you unfamiliar with the term. Glamping is luxurious camping, and Palmar does it up right. There is no room service, but with everything else that's available, who needs room service right. They have multiple Tents for rent, showers, common & dinning area, community kitchen, and most importantly a bar. I know what you might be thinking "community kitchen"... but it is a great time cooking with strangers, before you know it you'll be dinning and sharing food with new friends. If you need supplies, don't worry it's a quick boat ride in to Bocas to hit up all the local shops.


The tents for rent are amazing, with beds, fans, and storage.... your not sleeping on the ground here.


To be completely honest as nice as the tents are, the amount of time you will spent in them is minimal. The best part of a place like Palmar is not where your laying your head, but with the people you meet.  the majority of your time will be spent in the great house socializing. They also put on events such as live music and group dinners. If you have anything close to the experience we did, you'll walk away from your trip with a handful of new friends and great memories. 


Now since my trip Chris and Kristin have added a few new additions I have not seen. A yoga studio that looks great with regular classes, some new tents, and a wood fire pizza oven. I'm sure there are plenty more considering Kristin's creative nature, but that's all I have kept up on.


If your looking for a Central American get away, I highly recommend Palmar. You will not be disappointed!

Oh I didn't even talk about the beach. Red Frig beach is beautiful. Even though it might look like a calm Caribbean beach, do not be fooled. You can surf this puppy, In the evening Red Frog produces some nice waves for the persons interested in surfing or body surfing. 


Thanks!

Lets talk tools!

Monday, April 14, 2014


Hey guys. I thought I would have a little talk about tools. I use to work in the Tools & Hardware department at Lowes. Everyday I had people asking me how tools worked and what they should buy, so lets break it down. What I want to cover is the basic hand tools and power tools, that every DIY person should be comfortable with and know their uses. There is a tool for every job, and we could be here for days talking about the purpose of all the tools on the market. I am not covering the tools of a cabinet maker or fine carpenter, these that I am discussing are for the Pintrest and DIY toolbox.

Before we get going, SAFETY FIRST, when using tools wear safety glasses or goggles, if sanding use a dust mask,  its always good to wear gloves and remove rings and jewelry. Also when using rotary equipment make sure you are not wearing loose clothing.... this stuff can be dangerous and will hurt you! 

Lets start with the basics. Most everyone owns a Hammer, pliers and screwdrivers. If you do not, then you should because these are your bread & butter as far as hand tools go. You will use these tools more than any other in your toolbox.
  • Standard Claw Hammer
  • Multiple function screwdriver


  •  Needle nose, slip joint pliers, and vice grips.

The next thing your going to want is measuring and leveling tools. A Tape measure, speed square, carpenter square is a must, it will give your building projects a fast 90 degree check for tables, shelves, frames, etc.... You will also want a level, their are different sizes so buy what need. There is no reason to own a 5 foot level when you only need a 1 foot level.
  • Tape Measure
  •  Speed Square

  • Carpenter square
  • Level

Another great tool to have is a staple gun... fabric to Christmas lights, you'll need and use it.

The last of the Hand tools I'm going to mention are cutting tools. A hand saw, miter box, and coping saw. These saws will do just about everything their powered brothers can with a little sweat on the operators part.

  • Basic hand saw


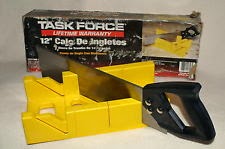
  • Miter box, good for clean cuts and 45degree angles.
  • A coping saw, this is one of my favorite saws. It is great for cutting patterns or quick cuts, their is also metal hacksaw blades that come with the saw.

OK, lets get into power tools. These are the basic and less complicated of the bunch. First off, let me tell you my philosophy on power tools. Power tools are expensive, and if your on a budget harbor freight is going to be your best friend. If their is a tool you use daily or even weekly, spend the money on a good name brand one. If its a tool your going to use every six months, then go to Harbor Freight, you'll thank me later for spending $40 on a biscuit jointer instead of $150 from Lowes.

With all power tools, make sure they have come to a complete  stop before setting them down or walking away from the tool. And wear your safety glasses!
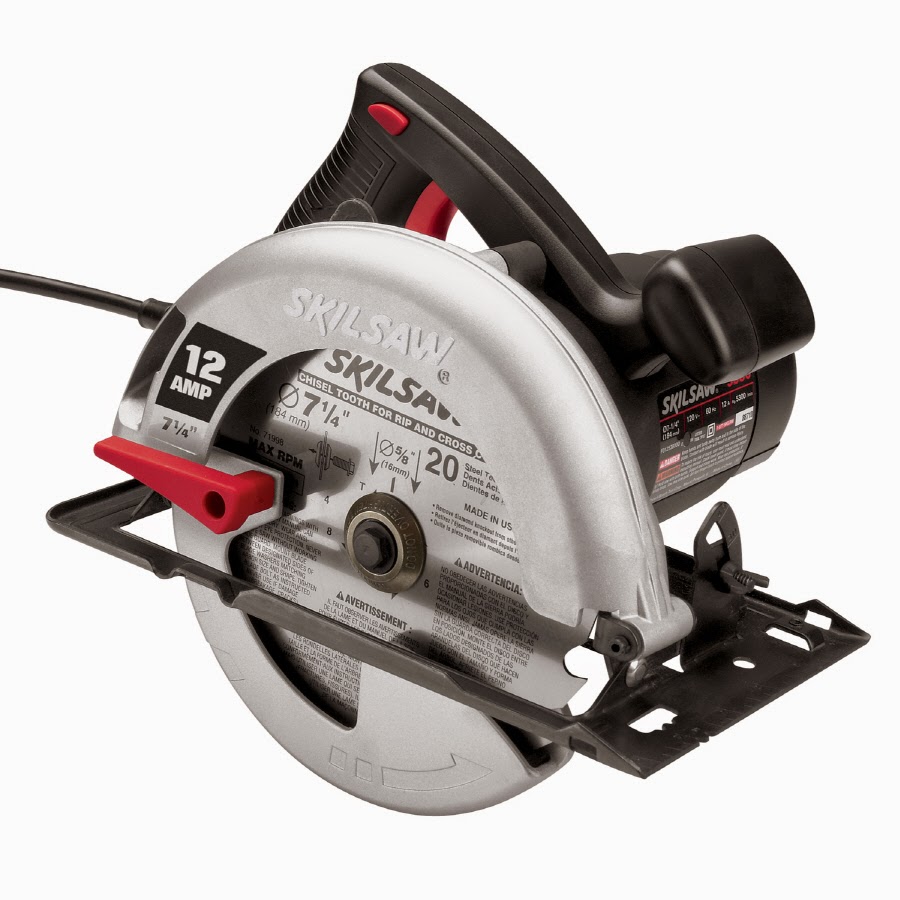
  • Skilsaw, This saw requires a firm grip. This is a straight line cutting saw, if you try to make a curve cut, the blade will bind and bend, which is not good.


  • Jigsaw, like the coping saw this is great for cutting patterns, straight lines can be challenging with out a straight edge.

You may also want these two accessories to accompany these two saws
  •  A clamp down straight edge.
  • A chalk line, just give the sting a snap to get your line.

 The reciprocating saw with a wood and nail blade is great tool for cutting apart pallets. 
  • reciprocating saw, there are many different blades and lengths. 
This small tool has many different size bits and uses, and comes in a range of models from corded to cordless. The Dremel Tool is a fantastic tool for small projects, it is really the Swiss Army knife of rotary tools, and is used from everyone ranging from beginner to expert craftsman. If you are unfamiliar with this tool I suggest looking on their website or your local hardware store and picking one up. It is really an invaluable tool.  

  • The Dermel Tool


The drill, now there are two options and this really goes for most power tools today. Corded and cordless, the benefit of corded is there is no batteries to charge but there is an extension cord that will probably need to be used. Second is cordless, here you have batteries to charge but much more flexibility of movement. This is probably a power tool your going to want to spent the extra money on, and purchase a quality drill, because you will use it ALL the time. If you buy a cordless, I would get a 18volt or 20volt lithium, there a little bit more expensive but they holds the charge a lot longer.
  • Cordless drill
Here are a few sets that you might want to have for your drill
  • A basic driver set, a lot of screws are getting away from the phillips + and straight  - drivers, most are moving to the star and box type drivers because they strip out less, so if you buy a set make sure it has all 4 types.

  • A varied size drill bit set. This is something that price can depend on, the better quality the drill bit the more they cost and sharper they stay, but the smaller bits can break easily so it is not uncommon to have bits missing from your set after a few projects. Its your call.

  
  • This is a hole saw kit, its something I added because it can be handy.

Power sanders, this is a great tool. There is a few types, a round, square, and a corner base vibrating sanders. I am only showing the square base sander because its the easiest one to cut sandpaper to fit.
  •  Square base vibrating sander.

Another type of sanding tool is a angle grinder, this tool requires some skill but can be very effective. This tool has a few different wheels than can be changed out for cutting, metal grinding and wood sanding.
  • Angle grinder

  • Wood and metal wheels.


Clamps, if you are gluing, sawing, grinding, or sanding you will need to clamp it together or clamp it down. You may need many of these and I highly recommend harbor freight. There cheap and do the exact same job as the expensive ones.

 The last two Power tools I'm going to talk about are not a necessity, but if you have the space and the finances then they are a great addition. They are a Power chop saw, and a table saw. The chop saw is just a power miter box, and will cut your projects in half... literally. The table saw is great for ripping down boards. Both are pricy but once you have them, you will wonder how you lived with our them.
  • Chop saw
  • Portable table saw.

I hope this helps some of you out there, that want to do more creative projects, but don't really know much about tools. Check out Harbor Freight for some cheap tools, and remember all that makes a person an expert is practice. www.harborfreight.com  and all photos were pulled off Google.

Thanks!


Quick & Easy Way to Make Mosaic Pins

Thursday, April 10, 2014

What are Mosaic pins? All a mosaic pin is, is different sizes of brass, copper, aluminum, and steel tubing or wire inside one another, then filled with an epoxy, they primarily have a decorative purpose. (disclaimer) I am by no means an expert on this subject, but I have dabbled a little... and all that makes a person an expert in a craft is practice, so lets practice.... The tubing can be anything from round, square, or you can use wire as a filler. Here is a picture I pulled off Google, to give you an idea of different patterns.

 
This is a list of the supplies I used.
  • Easy Cast. This can be found at Michael's or most craft stores.
  • Tubing. I don't remember the sizes, you really have to play with this part of the project and just see what fits.
  • Latex gloves.
  • A drill
  • Wax paper
  • Hot glue gun
  • Acrylic paint. color is your choice
  • Hacksaw. or something to cut metal with. A dremel with a metal cutting wheel works perfect.
  • and a metal file and fine grit sandpaper (250 to 500 grit)
  • Once you have all the supplies, you can start assembling the pins. I found that working in 6" sections was ideal. It made lining up the top and bottom inside tubes easier.
  • First drill the holes in a scrap piece of wood, don't drill all the way through, that way if there is a leak it doesn't drain the epoxy from your pin. ( I made that mistake)
  • Use the wax paper as a kind of plug, also it keeps the pin from being epoxied to the board. Once you have the pin in place, cut off the excess paper and hot glue the pin in place. This just keeps it from moving around. 
  • The next step is to mix the epoxy. It's really simple, equal parts from both containers. Now that you have them mixed in one container, you can add some color. There is probably 100 different ways you could do this with dyes and pigments, but I have a lot of acrylic paint on hand. The amount of paint you use varies, If you want a dark color mix more, for lighter mix less. But it really doesn't take a whole lot.
  • There are 2 ways you can fill the pins. This is where your going to want to wear your gloves.
  1. poor the epoxy directly into the main cavity, then insert the inside tubes or wire.
  2. insert the tubes or wire, then drizzle the epoxy over the top of the project. 
either way will work, but I think the second way makes more internal air pockets. Also this is going to be messy, but any epoxy on the outside of the pin can be sanded off easily once it dries.

  • Once the epoxy has set (give it 24hrs) then peel off the hot glue and wax paper. There is your Mosaic pin. The only thing left to do is insert them in to something. They look great in knife handles or in the place of a dowel rod pin (where it will be visible)  
  • To insert a mosaic pin in a piece of wood, just drill a hole the size of the outside diameter tube, cut the piece to size, then add some epoxy to the hole, and insert the pin. Once the epoxy has dried, file and sand flush. 

That's it!


This is one I put in a brewing mash paddle. It was a last minute addition, after I had already stained it so I couldn't file it down as much as I would have liked. That's why you can see some rough edges. This is why its important to plan the project out from start to finish.

I hope this was helpful, Have fun creating!  Thanks.


Hover to Pin

 
Designed with ♥ by Nudge Media Design