Rustic Table

Saturday, June 28, 2014

Well its been a good minute since Ive written a new post, to be honest I've been pretty busy with school and haven't had much time for new projects. I built this table awhile back between school semesters and have been putting off doing a write up on it. My wife had been asking me for a new dining room table that could accommodate her large family for the past couple of years, so I finally had some time and decided to build her one.


I built the top from reclaimed 2x6's, and the rest from new 2x4's, and 4x4's. Its was surprisingly a pretty simple project, from start to finish, I think it took about a week. The chairs are left over from out previous dinning room set.


The bench runs the length of the table, and to be honest I don't think I ever want a dinning room table with out one. We sit at the bench far more than any of the chairs. The bench is constructed completely out of 2x4's


Its a solid Table, I don't k now the exact weight but I know its heavy as hell.  It runs 7 feet in length, and 3.5 feet in width.


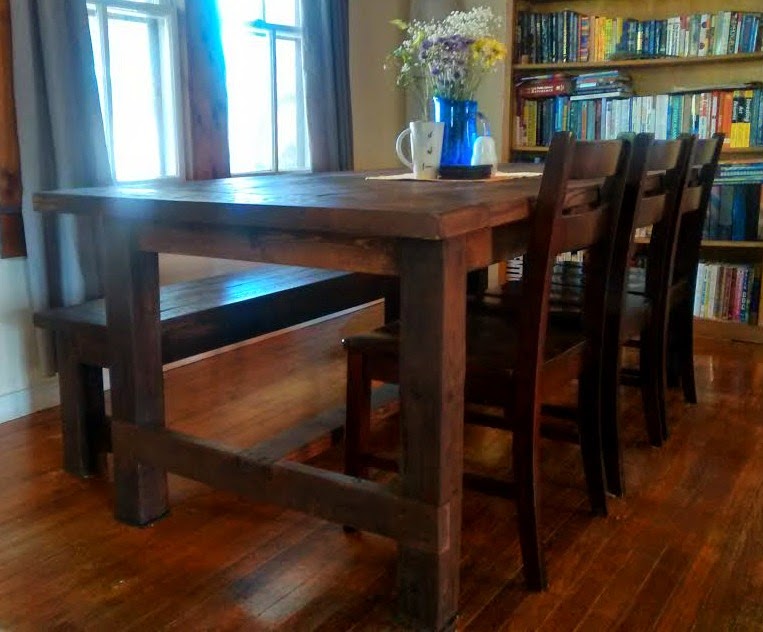
All in all I'm pretty happy with the final results. We put it to good use for my wife's birthday, where we had thirteen family members gathered for dinner. It was a little cramped but not completely uncomfortable. When my wife told me the size she wanted I was concerned it would be to large for the house. Now I cant imagine not having it, we put this table to use every single day, and its not uncommon for multiple art projects and homework to existence in the same vicinity without hindering one-another. If your thinking about building a large table, my advice would be to keep it simple and use materials and finishes that can be easily matched for future touch ups. After all whats the purpose of a huge dinning table but for cheer, food, and drink!

"If more of us valued food and cheer and song above hoarded gold, It would be a merrier world."  Hobbit.

As always thanks for checking out the page and have fun making something!


Deck cooler

Thursday, May 8, 2014


Who wants a plain old igloo cooler sitting on your deck, when you can have this instead? Not me!

I have seen many cooler modifications on Pinterst and YouTube, and by far the best one I have seen is from beachbumlivin, his video is really good and well put together. I got the basic idea for construction  from his video. I used pallets for the insets, shelf, and top lid. The rest of the wood I picked up at our local re-purpose shop for a descent price,  the cooler I already had so the only cost was hinges, bottle opener, and plumbing supplies. This was a really fun project to build, I had fun playing with different staining techniques. I used shoe polish for a good portion of the pre-stain, adding the polish gives a very aged look once a normal wood stain is applied over the shoe polish. For the rest of the shades of wood stain, I just used what I had already in my personal stock. 


When I plumed in the faucet, I decided to run it directly through the frame of the box. This ensures some stability to the hook up. My biggest concern was the plumbing, the last thing I wanted was myself or a drunk friend slapping off the faucet, so the way I did it makes for a solid connection and eliminates my concern.  The panels I just cut different sized wood pieces to fit in a mosaic pattern and stained them in random ways, the same for the side and back panels.  


The lid fits down completely, so the cooler is water tight. Even though I made this with reclaimed wood, I feel that the panels give it a classy look that I was very pleased with.


I hope this project inspires you to spruce up a old cooler that I'm sure you have laying around. As always thanks for checking out the page and have fun creating.


Celtic mash paddle

Saturday, May 3, 2014

This was a project I did a while back and am just now getting around to posting pictures of it. This project was a lot of fun, for one I have never dabbled in wood carving before and it gave me a reason to try my hand at making mosaic pins. So a Mash paddle is a tool used in brewing beer (is basically a big stir stick) I wanted to play around with a carving project and this gave me that opportunity. Typically a mash paddle is pretty basic, but whats the fun in being basic when you got skills right!


Because this was my first attempt at carving I used a softer wood (poplar) which I would have rather used oak or maple, but finding maple in Florida is damn near impossible. This paddle is more decoration than functional. Like I said I was looking more at the carving aspect that the practicality of the piece, but the next one I do will be oak.

I started out by laying down a pattern on a 3/4 board, then used a jigsaw to cut out the body of the paddle.


 Once the body was cut out, I drilled holes in each negative space on the knot section of the paddle. Then using a copping saw I cut out each negative space. This part takes a while so don't get frustrated.


After a rough sanding to clean up the edges and crevices, next is time to break out the chisels. Now I would not recommend using carpenters chisels but if that's all you got I'm sure you can pull it off with some fineness and patient. What I would recommend are carving chisels, you will have more versatility than you will with a straight edge chisel.


To get the affect that the wood is knotted, I dug down a 1/4 inch or so on the parts that would give it a uniformed weaved affect. It sounds more difficult than it is, the hardest part of doing a Celtic knot is making sure its consistent.

After I was satisfied with the knot work I carved a Scottish thistle in the handle, and because this is not a functional piece I used a not food grade stain. If this was a functional paddle I would have used a butcher block stain that is food grade or I would have just used mineral oil.  

  
I was really happy with the final product and would defiantly make another. As always I hope you enjoyed the post, if you have any feedback feel free to leave a comment and I'll get back to you as soon as I can!

Remember, all that makes a person an expert in a craft is practice!

Thanks.


Rustic Lamp

Hey guys, so this past semester I attended a three dimensional design class, and the finial project was to take a item or items that have one purpose and turn them into some thing useful... so I made a lamp out of copper tubing and fittings.

I am still trying to be mindful that I have a blog, and I have a few projects I have done recently that I didn't take any pictures of, sorry!


The body of the lamp is copper tubing and fittings, and the base is a piece of fire wood I had in my wood stack. I cut the log in to a block on a band saw then used a chisel to distress the block to look cracked and aged. For a stain I used brown and black shoe polish in random spots, then blended the two with Danish oil, the color turned out nice.  


As for the cord, I wanted a vintage looking cord. I know you can buy vintage lamp cords online but I just took two pieces of wire and twisted the using my cordless drill. Using a drill to twist wire or rope is a fast and easy way to get a consistent wrap throughout the length of  wire/rope.


Finally, with keeping the rustic/vintage look I picked up a Edison bulb from Lowes. This project was Fairly easy, I soldered all the fittings in place and if you have never done this before its not as hard as you might think. All you need is a plumbers torch, solder, and some flux. Copper heats really fast so each fitting only takes about 30 seconds to do. Another thing to remember when soldering something like this, is this lamp is not going to hold water nor are most of us professional plumbers, these joints don't have to be perfect. If you get solder everywhere it's nothing a file and wire brush cant fix. 


If anyone wants to make something similar to this, let me know and I'll try to make up another one for a tutorial. Or if you might have a question about soldering fittings or wiring up a lamp leave me a comment and I'll promptly return a comment.

Remember if you do attempt any kind of soldering, plumbing or electrical you are dealing with extreme heat sources, so be mindful of your surroundings and your extremities!!! Burns happen often.


As always thanks for checking the blog out and keep coming back!


Label Remover

Monday, April 28, 2014


I have to talk about this product. UN-DU sticker, tape & label remover. This stuff is awesome! I found this stuff at Walmart in the craft section the other day, but I'm sure it can be ordered online as well. So the group of hobbyists I'm directing this at are home brewers who are still cleaning labels off reused bottles. I'm sure this product works great on all other products attached by adhesive, but I can tell you it works fantastic on beer labels.


 I still soak my bottles in hot water, to clean off any goop still inside the bottle and to soften up the paper labels. The problem with most labels is not the actual label, its the adhesive that keeps the label attached to the glass bottle. That is where this UN-DU comes in. I added a few drops to the adhesive still stuck on the bottle, and it practically whips away. The bottle also has that black scrapper, that does a really good job getting under really tough sections of labels, such as champagne labels. I'm not one to really promote products, but seriously this stuff cut my bottle cleaning in half. Its really does a great job at getting glue and adhesive's off.


I hope this helps some of you out, and feel free to leave any comments if this helps out!

Thanks


Past projects.

Saturday, April 19, 2014

These are a few pallet projects I did awhile back, and thought I would put up some pictures for everyone to see.

This is a dog bed made from one pallet, it was super simple and took about 2 hours to complete.


A dog food station, this one took a few hours over a couple of days to finish. It was a project I had been wanting to do for a long while, and the dogs love it.... spoiled rotten pups.

This project was a Pintrest project, that ended up looking really nice.

Coat hanger tree.


I love using pallets for projects, for one there free most of the time and second, they give a project a rustic look. I know pallet projects are all over Pintrest and DIY sites right now, which makes the ability to find pallets a lot harder. But there still around if you keep your eye out. As always I hope you guys love the pictures.

Thanks.


Palmar Tent Lodge

Thursday, April 17, 2014

I want to give a little shout out to one of my most favorite places I've visited.  My wife and I were backpacking through Costa Rica and Panama a year or so ago and volunteered for awhile at  Palmar Tent Lodge located on Isla Bastimentos in the Bocas del Toro Province of Panama.  Palmar is an amazing place ran by two amazing people, Chris & Kristin. Just a stone's throw from Red Frog beach you'll be laying out and relaxing as soon as you arive. It was rated as on of the top 10 secret beaches by the Travel Channel. Palmar is a great escape from... well Everything!


Palmar is a tent lodge and falls in to the glamping category or glamor camping for those of you unfamiliar with the term. Glamping is luxurious camping, and Palmar does it up right. There is no room service, but with everything else that's available, who needs room service right. They have multiple Tents for rent, showers, common & dinning area, community kitchen, and most importantly a bar. I know what you might be thinking "community kitchen"... but it is a great time cooking with strangers, before you know it you'll be dinning and sharing food with new friends. If you need supplies, don't worry it's a quick boat ride in to Bocas to hit up all the local shops.


The tents for rent are amazing, with beds, fans, and storage.... your not sleeping on the ground here.


To be completely honest as nice as the tents are, the amount of time you will spent in them is minimal. The best part of a place like Palmar is not where your laying your head, but with the people you meet.  the majority of your time will be spent in the great house socializing. They also put on events such as live music and group dinners. If you have anything close to the experience we did, you'll walk away from your trip with a handful of new friends and great memories. 


Now since my trip Chris and Kristin have added a few new additions I have not seen. A yoga studio that looks great with regular classes, some new tents, and a wood fire pizza oven. I'm sure there are plenty more considering Kristin's creative nature, but that's all I have kept up on.


If your looking for a Central American get away, I highly recommend Palmar. You will not be disappointed!

Oh I didn't even talk about the beach. Red Frig beach is beautiful. Even though it might look like a calm Caribbean beach, do not be fooled. You can surf this puppy, In the evening Red Frog produces some nice waves for the persons interested in surfing or body surfing. 


Thanks!

Lets talk tools!

Monday, April 14, 2014


Hey guys. I thought I would have a little talk about tools. I use to work in the Tools & Hardware department at Lowes. Everyday I had people asking me how tools worked and what they should buy, so lets break it down. What I want to cover is the basic hand tools and power tools, that every DIY person should be comfortable with and know their uses. There is a tool for every job, and we could be here for days talking about the purpose of all the tools on the market. I am not covering the tools of a cabinet maker or fine carpenter, these that I am discussing are for the Pintrest and DIY toolbox.

Before we get going, SAFETY FIRST, when using tools wear safety glasses or goggles, if sanding use a dust mask,  its always good to wear gloves and remove rings and jewelry. Also when using rotary equipment make sure you are not wearing loose clothing.... this stuff can be dangerous and will hurt you! 

Lets start with the basics. Most everyone owns a Hammer, pliers and screwdrivers. If you do not, then you should because these are your bread & butter as far as hand tools go. You will use these tools more than any other in your toolbox.
  • Standard Claw Hammer
  • Multiple function screwdriver


  •  Needle nose, slip joint pliers, and vice grips.

The next thing your going to want is measuring and leveling tools. A Tape measure, speed square, carpenter square is a must, it will give your building projects a fast 90 degree check for tables, shelves, frames, etc.... You will also want a level, their are different sizes so buy what need. There is no reason to own a 5 foot level when you only need a 1 foot level.
  • Tape Measure
  •  Speed Square

  • Carpenter square
  • Level

Another great tool to have is a staple gun... fabric to Christmas lights, you'll need and use it.

The last of the Hand tools I'm going to mention are cutting tools. A hand saw, miter box, and coping saw. These saws will do just about everything their powered brothers can with a little sweat on the operators part.

  • Basic hand saw


  • Miter box, good for clean cuts and 45degree angles.
  • A coping saw, this is one of my favorite saws. It is great for cutting patterns or quick cuts, their is also metal hacksaw blades that come with the saw.

OK, lets get into power tools. These are the basic and less complicated of the bunch. First off, let me tell you my philosophy on power tools. Power tools are expensive, and if your on a budget harbor freight is going to be your best friend. If their is a tool you use daily or even weekly, spend the money on a good name brand one. If its a tool your going to use every six months, then go to Harbor Freight, you'll thank me later for spending $40 on a biscuit jointer instead of $150 from Lowes.

With all power tools, make sure they have come to a complete  stop before setting them down or walking away from the tool. And wear your safety glasses!
  • Skilsaw, This saw requires a firm grip. This is a straight line cutting saw, if you try to make a curve cut, the blade will bind and bend, which is not good.


  • Jigsaw, like the coping saw this is great for cutting patterns, straight lines can be challenging with out a straight edge.

You may also want these two accessories to accompany these two saws
  •  A clamp down straight edge.
  • A chalk line, just give the sting a snap to get your line.

 The reciprocating saw with a wood and nail blade is great tool for cutting apart pallets. 
  • reciprocating saw, there are many different blades and lengths. 
This small tool has many different size bits and uses, and comes in a range of models from corded to cordless. The Dremel Tool is a fantastic tool for small projects, it is really the Swiss Army knife of rotary tools, and is used from everyone ranging from beginner to expert craftsman. If you are unfamiliar with this tool I suggest looking on their website or your local hardware store and picking one up. It is really an invaluable tool.  

  • The Dermel Tool


The drill, now there are two options and this really goes for most power tools today. Corded and cordless, the benefit of corded is there is no batteries to charge but there is an extension cord that will probably need to be used. Second is cordless, here you have batteries to charge but much more flexibility of movement. This is probably a power tool your going to want to spent the extra money on, and purchase a quality drill, because you will use it ALL the time. If you buy a cordless, I would get a 18volt or 20volt lithium, there a little bit more expensive but they holds the charge a lot longer.
  • Cordless drill
Here are a few sets that you might want to have for your drill
  • A basic driver set, a lot of screws are getting away from the phillips + and straight  - drivers, most are moving to the star and box type drivers because they strip out less, so if you buy a set make sure it has all 4 types.

  • A varied size drill bit set. This is something that price can depend on, the better quality the drill bit the more they cost and sharper they stay, but the smaller bits can break easily so it is not uncommon to have bits missing from your set after a few projects. Its your call.

  
  • This is a hole saw kit, its something I added because it can be handy.

Power sanders, this is a great tool. There is a few types, a round, square, and a corner base vibrating sanders. I am only showing the square base sander because its the easiest one to cut sandpaper to fit.
  •  Square base vibrating sander.

Another type of sanding tool is a angle grinder, this tool requires some skill but can be very effective. This tool has a few different wheels than can be changed out for cutting, metal grinding and wood sanding.
  • Angle grinder

  • Wood and metal wheels.


Clamps, if you are gluing, sawing, grinding, or sanding you will need to clamp it together or clamp it down. You may need many of these and I highly recommend harbor freight. There cheap and do the exact same job as the expensive ones.

 The last two Power tools I'm going to talk about are not a necessity, but if you have the space and the finances then they are a great addition. They are a Power chop saw, and a table saw. The chop saw is just a power miter box, and will cut your projects in half... literally. The table saw is great for ripping down boards. Both are pricy but once you have them, you will wonder how you lived with our them.
  • Chop saw
  • Portable table saw.

I hope this helps some of you out there, that want to do more creative projects, but don't really know much about tools. Check out Harbor Freight for some cheap tools, and remember all that makes a person an expert is practice. www.harborfreight.com  and all photos were pulled off Google.

Thanks!


Hover to Pin

 
Designed with ♥ by Nudge Media Design