Open Book Holder.

Thursday, December 24, 2015


While visiting family in Iowa, I was able to pick up some hardwoods that I unfortunately can not find in Florida. Well I can't find it cheap anyway.

I have seen these on Pinterest and in other media sources, so these are not an original idea... Just a disclaimer.

I made two of these for my wife for Christmas and I'm really happy with the way they turned out, the two toned one is walnut and maple, and the three toned ones are walnut, oak, and, osage. 

Thanks for stopping by and never stop creating! 


Dovetail Keys

Monday, December 14, 2015

Tried my hand at dovetail inlay keys today. It's really an easy process, and I've always liked the look. I like that it keeps the piece the same, but different. 

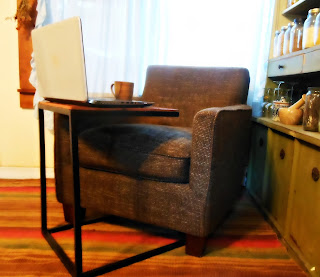
Laptop Table

Thursday, June 4, 2015

 Well... it has been a minute since my last post. I have been crazy busy the past few months and life has kept me pretty booked. I did this project a couple of months ago, initially it was going to be a gift for my sister-in-law, but.... I didn't love the way the top looked so I kept it.  It is a fairly simple design that allows you to slide the bottom under a couch or chair in order to use a laptop with out sitting it on your lap. It also makes a nice end table, the top is reclaimed wood and the base is square steel tubing.  I'm not going to do a big write up on this, because honestly there isn't a whole lot to talk about, but I promise there are more post to come. As always thanks for stopping by, and never stop creating! 


Quick & Easy Bird Feeder

Sunday, March 29, 2015

Hey Guys, I thought I would share a very inexpensive project that I use to make bird feeders. The thing about these feeder are they are pretty heavy duty, and I wanna say it cost like 3 or 4 dollars to make one. 

Materials: 

  • 2 plates, bowl and plate, coffee cup and saucer.... whatever you you wanna use is fair game. I get mine at dollar Tree or a thrift shop, lets keep it cheap! 
  • 1/4 inch piece of all thread rod... get a few feet so you'll have extra for multiple feeders.
  • 4 nuts and 4 washers to fit the all thread rod
  • You can use a piece of copper tubing to hide the rod, its really your choice.
  • Lastly I would recommend some silicon or some type of water sealant to put on the washers, once you tighten everything down. Just to keep water from leaking into the bird seed.
  • All you will need as far as specialty tools are a drill, a small hacksaw, and glass and tile drill bits to drill through the glass or porcelain. (use some water on the base of the dishware while drilling, it keeps the bit from over heating.
I am not going to go into a compleat explination of every step, becaue I feel like it's pretty self explanatory from the pictures. Although if anyone out there does need a step by step, leave a comment and I will edit the post to add the steps.

So yeah that's really it, this is super easy  project and it only take about 15 minutes to make a nice looking feeder to hang outside a window or off a deck.

Thanks for reading and as always never stop creating.


Again Thanks for stopping by and I hope you enjoyed the post!

Feedback

Monday, February 9, 2015

          Hey guys, I wanted to ask anyone out there whose reading my blog if you could take a minute and give me some feedback. This could be about anything you want, if you like a project I've done, wanna see a specific project, or know a better way to do something, hell if I need to be corrected because I don't know what I'm talking about, please leave a comment.

The reason I'm asking this, is because I really don't know who is reading this and I wanna know, or at least an idea of who my audience is. Are you a Pintrest junkie like me, or a weekend DIY warrior, or do you just like the pictures. Anyway all any positive or negative feedback will do is boost my confidence with the blog and  keep me blogging more regularly. And yes, I wanna hear the negative stuff too, growth is not always achieved by kind words.

The thing with blogging and anyone who knows me can verify this, is I hate writing! It is actually really difficult but also rewarding for me to sit and write these post. So yeah I just wanna make sure I'm heading in the right direction.

Thanks everyone, and as always never stop creating! 
        
       Also, I know the the title of my blog is Sawdust and Hops. I haven't posted anything about home brewing beer yet, and I'm sorry for that. Its coming tho, I am in the process right now of gathering materials to build a gravity tower for an all grain system. My hope is once my all grain system is operational I will be brewing more often. Extract brewing can be pretty expensive, and switching to all grain will reduce the cost considerably. 

Remy & Hawk

Sunday, February 8, 2015

        I snapped these pictures of my boys the other night, and had to post them. I love these guys, they always make my day better. They do make projects pretty difficult sometimes by either laying under or on top of my tools, or by stealing what they mistake as wood scraps as chew toys. They are a couple of class acts, and I don't know what I would do with our them. 


New Handles for a Drawknife and Chisel.

Friday, February 6, 2015

        A few weeks ago I picked up an old drawknife and chisel blade at an antique shop. they were both in pretty bad shape but the price was right so I couldn't resist. The drawkinfe is a tool I have been keeping my eye out for months, so unless it was completely rusted in half, I was gonna buy it. They were both heavy rusted and after cleaning them both with a wire wheel, they showed promise. The chisel cleaned up nice with no pitting in the steel, the same thing couldn't be said about the drawknife. It was heavily pitted, but for my needs it will serve no issue. For my first attempt at replacing handles in already existing tools, I think I did a pretty good job.  

I wish I would have snapped some pictures of them before I cleaned them up, i'm really bad about keeping my blog in mind when I start a project. Especially when its a small project like this... I'll work on it. I didn't take any pictures of the process I used with the chisel, I really wish I would have because I don't own a wood lathe, and I shaped it by hand. This is something I'm really going to work on. 

I hope you enjoy the post and pictures, and as always Never Stop Creating!


Homemade Grapefruit Soda.

Monday, February 2, 2015

        This is a recipes for a homemade grapefruit soda. I have been making homemade ginger ale for a while now, actually its tastes more like a ginger beer than an ale, so I'm gonna just call it ginger beer. Anyway when I was backpacking through Costa Rica and Panama I couldn't get enough of the Fresca down there, its made with cane sugar instead of high fructose corn syrup.

 So I had some extra Grapefruits in the fridge and thought what the hell. The process I use in making ginger beer is the same one I used in the grapefruit recipe, I am going to do post on the ginger beer recipe soon. OK lets get to it!

This makes 2 liter, You will need.... 

1 empty plastic 2 liter bottle... OK, I know some people have an aversion to using plastic, and your more than welcome to try using glass. Just be warned that with glass you cant tell how much pressure is in the container and it could blow the top. With the plastic bottle its easy to push on the side to check for hardness. 

3-5 Grapefruits... depending on the size and amount your doing, you could use more grapefruit juice to less sugar really.

1 cup - 1 1/2 cup Cane Sugar.

1 cup water

1/2 a lemon

1/4 teaspoon Champagne yeast... If you live somewhere that is unfortunate enough not to have a home brewing shop then I'm so sorry, but you can pick up this yeast at Northern Brewer 


Ok, your gonna be amazed at how easy this is! The first thing your gonna want to do is Juice the grapefruits and the 1/2 lemon. The juice can be set aside in a container, next boil the 1 cup water and remove from heat, you don't want the sugar to burn to the bottom of the pan.


Now you can add the Sugar and mix until dissolved. So what I said earlier about the amount of sugar to juice would apply here. If you add less sugar it will be less sweet, but the juice is is somewhat sweet already, so I would recommend making the soda my way first if this is your first attempt at making soda and then tweak the recipe to better fit what your looking for.


. From here add the Juice that was set aside earlier, you can let the sugar water cool or not, I don't think it really matters. The juice is going to cool it down anyway. Once the juice is added, use a funnel to pour the the sugar/juice mixture in to the bottle. 


Next top off the bottle with water (very important, leave about and inch of head space at the top)  and give it a taste. You can add more sugar at this point if its not sweet enough. 


The head space will allow for room for carbonation. Next add the 1/4 teaspoon champagne yeast, and cap the bottle and shake to mix the yeast (not hard). 


Real quick about yeast, the reason you want to use champagne yeast verses bakers yeast or ale yeast. Is because your just using it to carbonate the soda. A beer yeast would add to much flavor and through off the taste of the soda, champagne yeast doesn't add much for flavor. As far a bakers yeast goes.... I wouldn't try it, I mean any yeast added to any sugar should make carbonation or even alcohol given enough time. Just stick with the champagne yeast! 

Alright your done! You just made homemade soda! All that's left is to let it set for a day or two. Just let it set on the counter out of direct light for 24 to 48 hours, I have had ginger beer ready in 24 hours before but I normally let it go for 48 hours. Once the bottle is hard when you try and push in on the side that's your cue its done. Put the bottle in the refrigerator until chilled, this will also stop the yeast from eating anymore sugar, stopping it from carbonating anymore.

I would also recommend opening the bottle over the kitchen sink and open very slowly!


Pour yourself a glass and enjoy. Cheers!  


As always thanks for reading and never stop creating!

Wood Carving Knife

Saturday, January 31, 2015

          Lately I have been playing around with wood carving, and looking in to carving tools,  knives, gouges, draw knifes etc...  At the same time I have also been wanting to try my hand at making a knife, so this seemed like the perfect opportunity. I took a blacksmith class a few years back where I  made a knife from a railroad spike. So even though I have never really tried my hand at knife making since then, I knew the basic principles from the previous class.
 This knife is primarily a wood carving knife, I cloned the design from a Mora 106 knife blade. All in all I thought it turned out pretty good for my first shot out the gate. I made the blade from an old chop saw blade I had laying around, and the handle from some left over oak scraps, the sheath is from some scrap leather. So even though this is knife and sheath are not perfect or works of art, they are functional and serve my desired purpose, and that is what really maters.

I hope you enjoy the post, and as always never stop creating!
Thanks.


Hover to Pin

 
Designed with ♥ by Nudge Media Design