Oak Celtic Mash Paddle

Sunday, January 18, 2015

             Awhile back I did a post on a mash paddle I had carved out of a piece poplar, it was a completely aesthetic piece. The soft poplar wood is great for carving, but for a usable mash paddle it is to absorbent and fragile.  I loved the design of the poplar paddle so much I decided to remake it using a piece of oak. I'm not going to go in to a big explanation of the steps I took to create this paddle. I did however use a wood burner this time around for the decorative features. I hope whoever is looking at this page, likes what the see and if so please re-post any pictures on Pintrest or Facebook. Thanks!


Again Thanks for checking out the blog, and as always "never stop creating"

Silk Screen Board

Friday, January 2, 2015

Last semester I took a silk screen class, that I really enjoyed. While looking in to the supplies needed to make a screen board, I realized I could make due with supplies I had laying around my work bench. There is really nothing special about this project, and the only reason i'm even writing about it, is because buying the clamps online can be pricey. Technically this project was zero cost for me, but if you were gonna buy supplies you would need a piece of plywood,  2 cheap C clamps, a scrap 1x2, 2 cheap door hinges, and some screws. Now this is not a tutorial on the process of silk screening, its just an idea for the screen board, and the image I used in the photos was not my original design.

Sorry for the blurry pictures, I took these with my phone. Anyway all this is, is a way to lift the silk screen so you can swap out paper, shirts, or what ever your printing on. If you notice I cut a section out of the back of the plywood. That is so the C clamps have room to clear the board.


I'll I did was attach the 1x2 to the hinges, and then clamp the silk screen frame to the 1x2. Like I said this was a super easy project, but is your in to or getting in to silk screening this is a quick project that works just as good as the 15-20 dollar clamps. 


I'll post a few pictures of my prints, to give you an idea of the kind of things you can do. When I took this class it was my first introduction in this medium, so if your a silk screener don't be to critical. Silk screen is a crazy cool process, and if you ever get the chance I highly recommend taking a silk screen class.  


These pictures are gonna be a little out of order, I guess I didn't take pictures of all the steps.... whoops


SO AS I ALREADY STATED THIS WAS NOT MY ORIGINAL DESIGN. But never the less they turned out super cool. 

Well I hope this helped a few people that need an idea fulfilled. As always thank you for looking at the page and please share the photos on Facebook or Pintrest, it helps me out with getting foot traffic on the page,

Thanks!

Keggle Mash Tun

Thursday, January 1, 2015

Hey, so its been months since my last post. That doesn't mean I haven't been busy though. I'm going to try and pay more attention to the blog this year. I've been an extract home brewer for about a year and a half, and finally wanted to get my hands in to all grain brewing. All grain is just cheaper per recipe and it allows for more personal input of your beer.  A buddy of mine had a keg laying around his place, and was nice enough to part with it.

Now a mash tun can be made out of all sorts of things, coolers, pots, and kegs. The reason I went the keg rout was because I prefer metal over plastic, its easier to clean and it will last forever.

So the first step is to release the pressure inside the keg, this accomplished by pushing straight down  on the ball valve. I would recommend placing a rag over the ball to keep stale beer from spraying you in your face. After the pressure is released you can do one of two things. 1 is to use a screwdriver to pry out the retaining ring, this can be a pain in the ass. 2 is to use your angle grinder to make a cut s to split the ring in half, this makes it very easy to pop the ring out. You don't need the top anyway as your about to cut a big hole in the top.


Once the dip tube is removed, make a circle around the top with a marker. I used the lid off my 5 gallon kettle as a template, although I did make it slightly smaller so I could use the lid on the keg, I think it was 11 inch diameter. Your gonna want to use stainless steel cutting discs on your grinder, I barley used a quarter of an inch of my disc.


Just go slow, there is no rush. Once the top drops, take a file and some sandpaper to the cut edge and smooth out the edge. Be careful metal splinters suck!

Next step is to install the valve, this is just as simple as drilling a home and tightening down the valve nuts. I'm not going to go in to great detail about this step because its really simple.


Just make sure you don't make the hole to big, because if you do your in for some extra work to correct the mistake. I suggest picking up a caliper at Harbor Freight for $3, Trust me you'll use it more often than you'll think.


Go slightly smaller, and ease it to the right size.


Pre-drill a hole to make the bores work a lot easier.


If your using a valve from a brew shop, its pretty standard install. 


And last but not least, do leak check and that's it.


So you might have noticed I didn't install a filter, and there is a few inches from the drop tube and the bottom of the keg. I still have some fine tuning to do before I cook up a batch.  I opted out of a false bottom, so I will do an update when I put on the filter.

Thanks for reading and looking at the page, I hope you got something out of it.

Rustic Table

Saturday, June 28, 2014

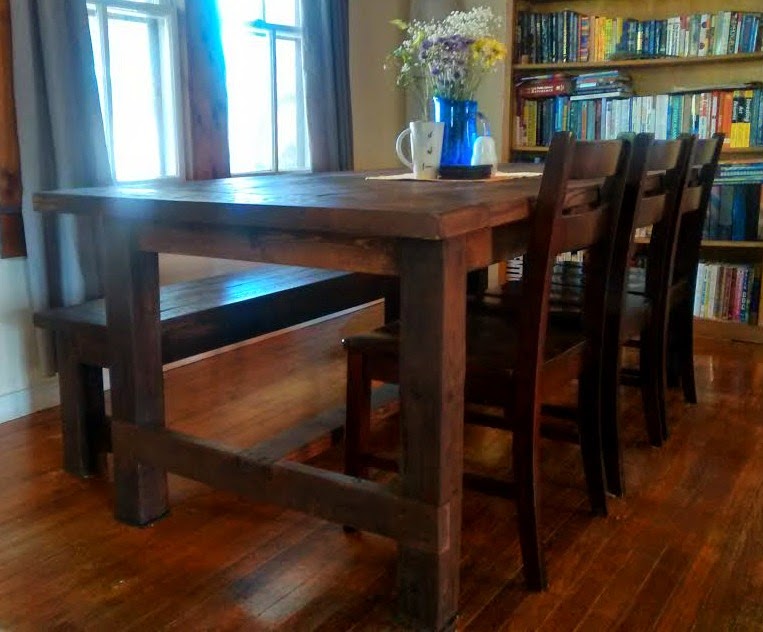
Well its been a good minute since Ive written a new post, to be honest I've been pretty busy with school and haven't had much time for new projects. I built this table awhile back between school semesters and have been putting off doing a write up on it. My wife had been asking me for a new dining room table that could accommodate her large family for the past couple of years, so I finally had some time and decided to build her one.


I built the top from reclaimed 2x6's, and the rest from new 2x4's, and 4x4's. Its was surprisingly a pretty simple project, from start to finish, I think it took about a week. The chairs are left over from out previous dinning room set.


The bench runs the length of the table, and to be honest I don't think I ever want a dinning room table with out one. We sit at the bench far more than any of the chairs. The bench is constructed completely out of 2x4's


Its a solid Table, I don't k now the exact weight but I know its heavy as hell.  It runs 7 feet in length, and 3.5 feet in width.


All in all I'm pretty happy with the final results. We put it to good use for my wife's birthday, where we had thirteen family members gathered for dinner. It was a little cramped but not completely uncomfortable. When my wife told me the size she wanted I was concerned it would be to large for the house. Now I cant imagine not having it, we put this table to use every single day, and its not uncommon for multiple art projects and homework to existence in the same vicinity without hindering one-another. If your thinking about building a large table, my advice would be to keep it simple and use materials and finishes that can be easily matched for future touch ups. After all whats the purpose of a huge dinning table but for cheer, food, and drink!

"If more of us valued food and cheer and song above hoarded gold, It would be a merrier world."  Hobbit.

As always thanks for checking out the page and have fun making something!


Deck cooler

Thursday, May 8, 2014


Who wants a plain old igloo cooler sitting on your deck, when you can have this instead? Not me!

I have seen many cooler modifications on Pinterst and YouTube, and by far the best one I have seen is from beachbumlivin, his video is really good and well put together. I got the basic idea for construction  from his video. I used pallets for the insets, shelf, and top lid. The rest of the wood I picked up at our local re-purpose shop for a descent price,  the cooler I already had so the only cost was hinges, bottle opener, and plumbing supplies. This was a really fun project to build, I had fun playing with different staining techniques. I used shoe polish for a good portion of the pre-stain, adding the polish gives a very aged look once a normal wood stain is applied over the shoe polish. For the rest of the shades of wood stain, I just used what I had already in my personal stock. 


When I plumed in the faucet, I decided to run it directly through the frame of the box. This ensures some stability to the hook up. My biggest concern was the plumbing, the last thing I wanted was myself or a drunk friend slapping off the faucet, so the way I did it makes for a solid connection and eliminates my concern.  The panels I just cut different sized wood pieces to fit in a mosaic pattern and stained them in random ways, the same for the side and back panels.  


The lid fits down completely, so the cooler is water tight. Even though I made this with reclaimed wood, I feel that the panels give it a classy look that I was very pleased with.


I hope this project inspires you to spruce up a old cooler that I'm sure you have laying around. As always thanks for checking out the page and have fun creating.


Hover to Pin

 
Designed with ♥ by Nudge Media Design